
The Windy Project
Background
In my previous post, I touched on how postprocessing could respond to gameplay, but the environment itself was static. Recently, the Double Loop Games Art Director, Graham, asked me to help make the environment art for our game look more alive. He was specifically interested in having foliage and particles react to wind. While I had worked on improving lighting and water on previous projects, I hadn’t tackled this kind of environment project before and was interested to see what was possible.
 Note I’ll again be using Unity’s 2D Game Kit to recreate the situation.
All the gameplay screenshots in this post are using 2D Game Kit assets, not from our game.
Ironically, while I was working on this task my air conditioning broke and I had to get a fan to try and stay cool in 90+ degree heat. I guess it was helpful to have a direct example of the things I needed to simulate. In hindsight, it’s hard to believe that the anything other than the doom of 2020 was responsible.
Investigation
Before implementing anything, I wanted to see if there was any existing Unity tech or something on the Asset Store that would do the job. As it turns out, Unity has something called a Wind Zone (which I’d never used before) which can apply wind to particle systems (if their external forces module is enabled) or SpeedTree-created trees. While I’m not using SpeedTree in either this sample project or at Double Loop Games, it was still a big help to be able to have a Wind Zone affect particle systems so I didn’t have to support that myself. Most of the Asset Store content seemed to be more about wind VFX (like dust) or were dependent on full 3D meshes to work well.
There are a couple of important considerations for the Wind Zone I want to cover, though:
- The most important one is that while the component supports varying the wind velocity with a base value, pulse parameters, and turbulence, it doesn’t provide a way to query the resulting wind. Some enterprising forum posts suggested making a hidden particle system and measuring the change in velocity on a particle over time but that seemed like it could potentially be error prone. In the Double Loop project, I ended up just deciding to model the pulse and turbulence on my own and feed it into the base value but I’ve omitted that demonstration in this example for space since you can extrapolate it from other motion happening in the shader.
- The Wind Zone just models speed, so to understand the direction you need to use the transform of the game object the Wind Zone component is attached to. As it turns out, there’s a 3D arrow gizmo drawn in the Scene window at the transform of the Wind Zone object to show which direction it is blowing, but it wasn’t obvious at first since it was pointing directly towards the camera so I didn’t realize it was there until I rotated around.
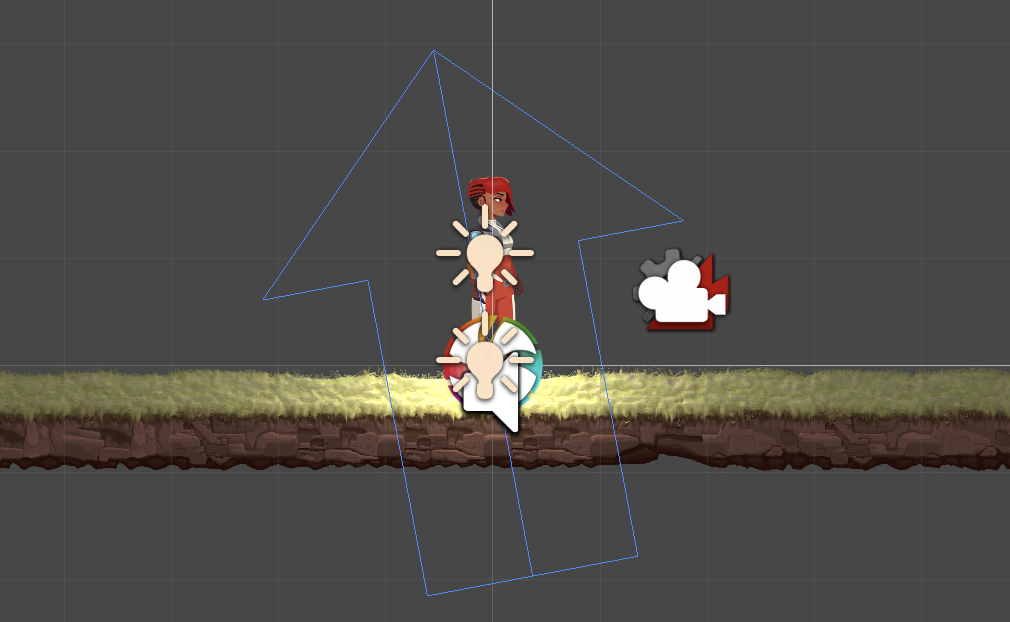
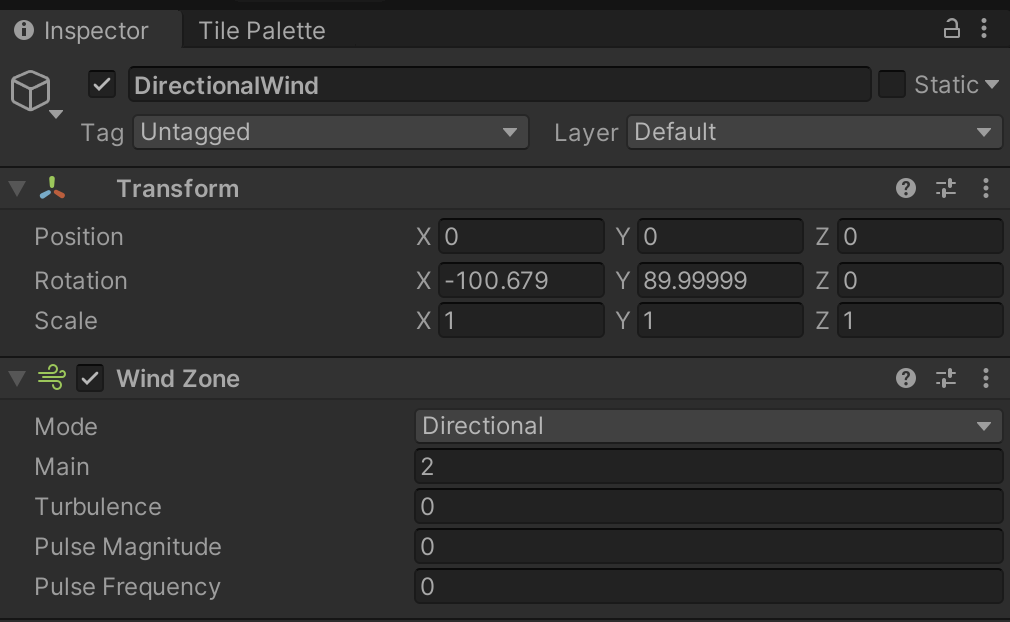
(Left) The Scene window showing the WindZone component gizmo as a blue arrow.
(Right) The Inspector window showing the transform and WindZone component contents for the instance shown on the left.
We’ll return to the Wind Zone component after we have figured out how to animate our foliage.
Preparation
Since there wasn’t an existing solution on the asset store that animated 2D sprites in the way I was hoping for, I decided to implement my own vertex animation. Doing so in a shader keeps the CPU free to just simulate gameplay. If I was working on a desktop- or console-only project, I could have implemented a tesselation shader ahead of the vertex shader to subdivide the sprite mesh dynamically and possibly provide more per-vertex information, but I couldn’t rely on that for mobile. A shader-based vertex animation should be pretty efficient, allowing me to have large amounts of foliage and only simulate the animation for objects that are on screen.
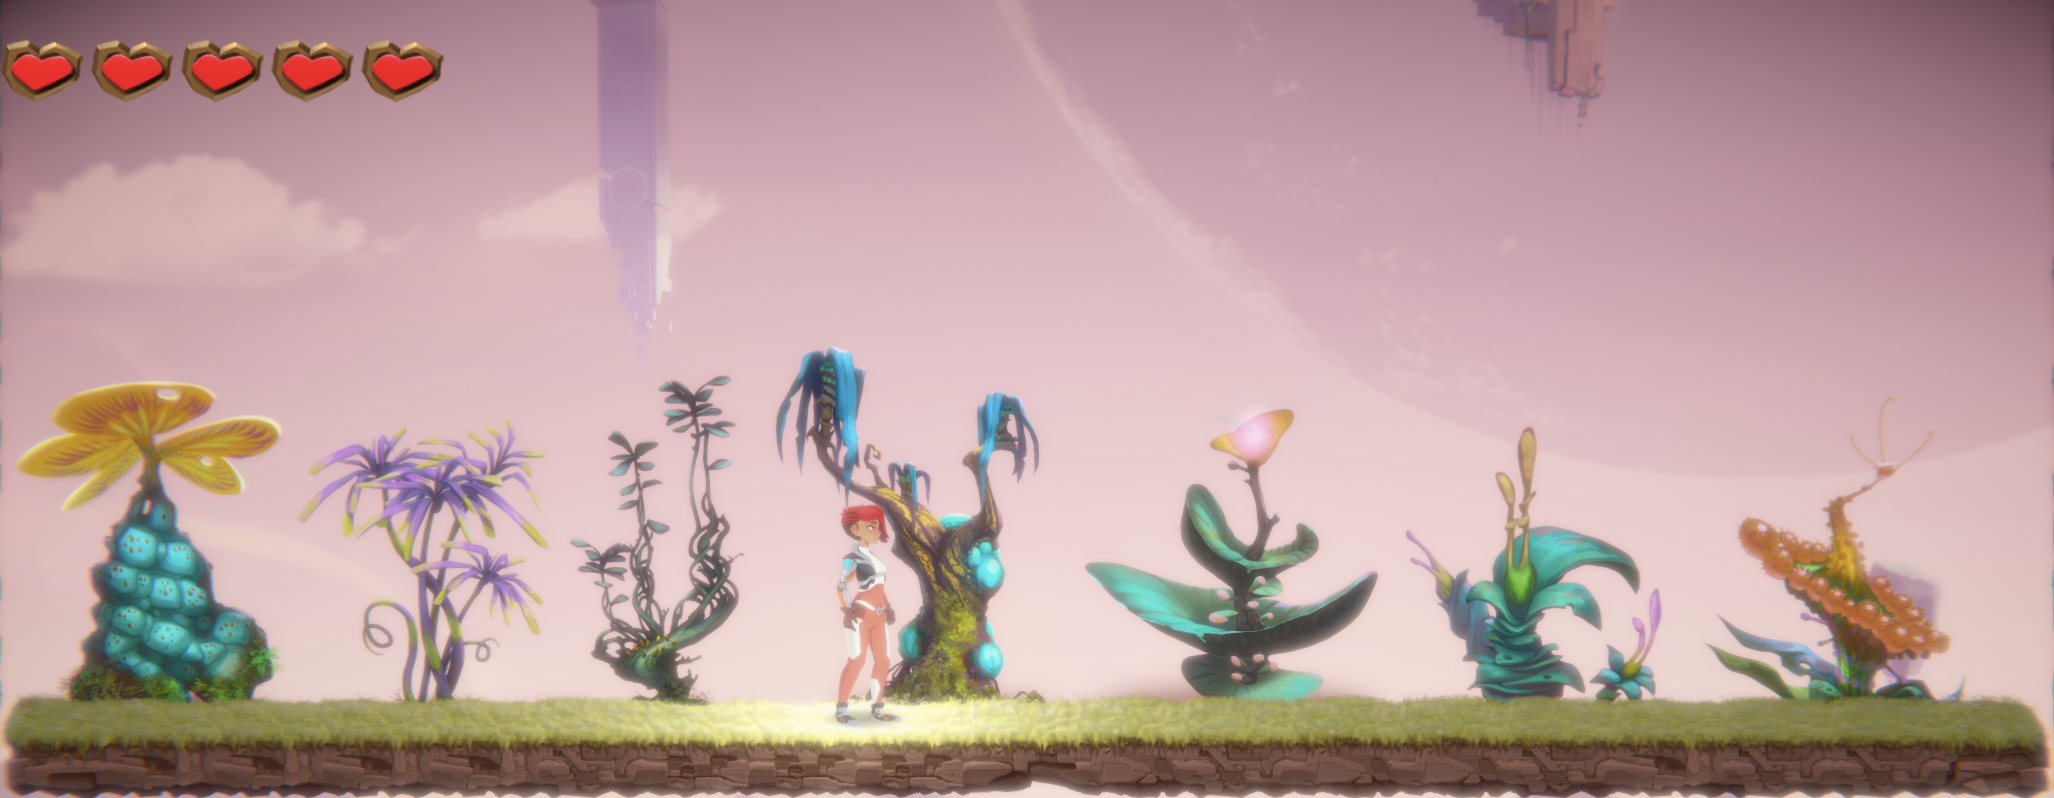
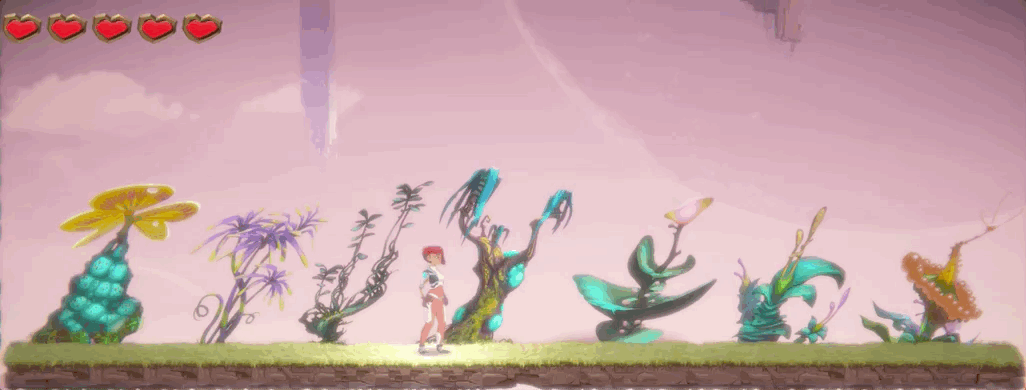
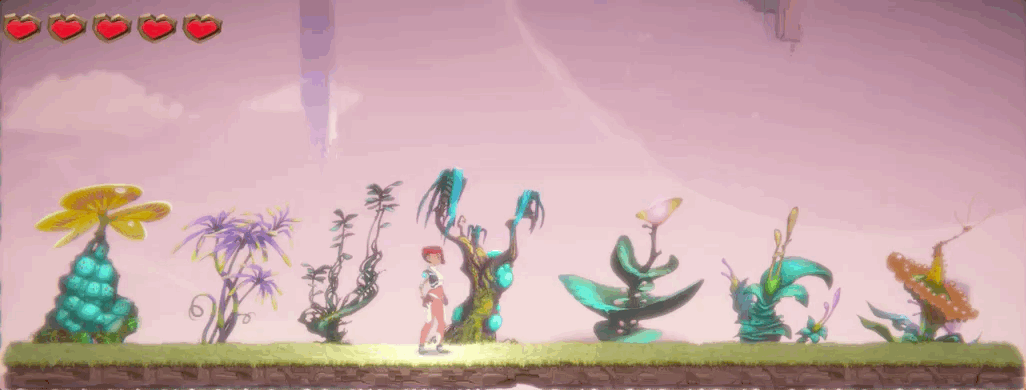
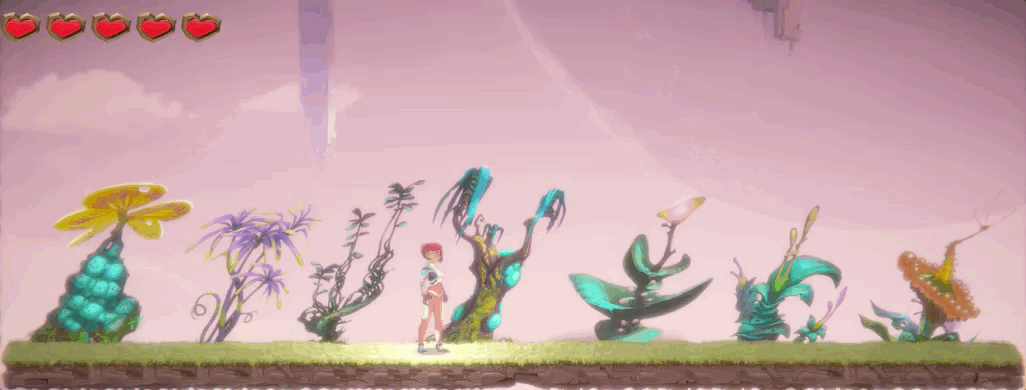
Since I couldn’t rely on a tesselation shader, I made sure that the sprites were set to use meshes that roughly fit the shape of the object with enough vertices that the animation would be more interesting than just stretching the corners of a quad. Unity’s Sprite Editor can be used to customize the mesh shape for a sprite. I wanted to use a variety of different plants to accentuate any flaws in the animation so I duplicated the Plants image in the 2D Game Kit. I then generated new shapes that more closely fit the visuals and had more vertices to play with (see Figure 3, below). After that I created a new demo scene in the 2D Game Kit project (pictured at the top of the post) with a sampling of different foliage with updated meshes.
(Left) The Sprite Editor window with the Plants_3 selected and the default outline.
(Right) The Sprite Editor window with the Plants_3 selected and an outline with 0.1 tolerance.
Note I didn’t add any animation to the fragment shader but that might also make sense depending on the type of mesh and texture you are using. The vertex animation was sufficient for my purposes so I didn’t implement it in this write-up either.
Creating a Shader
Unity recommends that new shaders should be written in HLSL rather than CG but the HLSL shader libraries are mostly limited to the Scriptable Render Pipeline (SRP). To help ensure the broadest compatibility, I based my shader on shader libraries from Unity’s Postprocessing Package (which I referenced in my previous post) since it is already included by the 2D Game Kit and compatible with the built-in pipeline and SRP. However, you could trivially convert the shader to a CG-based shader instead of an HLSL version if you’re using an older version of Unity.
To start with, I’ve just implemented the minimum necessary to display a sprite. The SpaceTransforms.hlsl is omitted for brevity but can be found in the source code at the end of the post (it’s just a copy of some functions from the core rendering package).
1
2
3
4
5
6
7
8
9
10
11
12
13
14
15
16
17
18
19
20
21
22
23
24
25
26
27
28
29
30
31
32
33
34
35
36
37
38
39
40
41
42
43
44
45
46
47
48
49
50
51
52
53
54
55
56
57
58
59
60
61
62
63
64
65
66
67
68
69
70
71
72
73
74
75
76
77
Shader "Sprites/Windy"
{
    Properties
    {
        [PerRendererData] _MainTex ("Sprite Texture", 2D) = "white" {}
        _Color ("Tint", Color) = (1,1,1,1)
    }

    HLSLINCLUDE
        #include "Packages/com.unity.postprocessing/PostProcessing/Shaders/StdLib.hlsl"
        #include "SpaceTransforms.hlsl"

        TEXTURE2D_SAMPLER2D(_MainTex, sampler_MainTex);
        float4 _Color;

        struct Attributes
        {
            float3 vertex : POSITION;
            float4 color : COLOR;
            float2 texcoord : TEXCOORD0;
        };

        struct Varyings
        {
            float4 vertex : SV_POSITION;
            float4 color : COLOR;
            float2 texcoord : TEXCOORD0;
        };

        Varyings Vert(Attributes i)
        {
            float3 wPos = TransformObjectToWorld(i.vertex);

            Varyings o;
            o.vertex = mul(GetWorldToHClipMatrix(), float4(wPos, 1.0));
            o.color = i.color * _Color;
            o.texcoord = i.texcoord;

            return o;
        }

        float4 Frag(Varyings i) : SV_Target
        {
            float4 color = SAMPLE_TEXTURE2D(_MainTex, sampler_MainTex, i.texcoord) * i.color;
            color.rgb *= color.a;
            return color;
        }

    ENDHLSL

    SubShader
    {
        Tags
        {
            "Queue"="Transparent"
            "IgnoreProjector"="True"
            "RenderType"="Transparent"
            "PreviewType"="Plane"
            "CanUseSpriteAtlas"="True"
        }

        Cull Off
        Lighting Off
        ZWrite Off
        Blend One OneMinusSrcAlpha

        Pass
        {
            HLSLPROGRAM

                #pragma vertex Vert
                #pragma fragment Frag

            ENDHLSL
        }
    }
}
Next you’ll need to create a new material that uses this shader and assign it to each of the Sprite Renderer instances in the scene. The quickest way to do this is to drag the shader on top of the material in the Project window and then drag the material on the instances in the Hierarchy window. After doing all of that, the plants in the scene should continue to look like like they did before the material & shader swap.
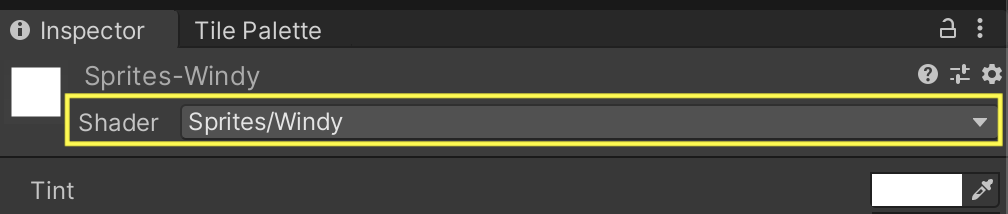
(Left) The Inspector window with the Sprites-Windy material selected and the Shader field highlighted.
(Right) The Inspector window with a plant instance selected and the Material field highlighted.
While we eventually want the wind vector to be dynamic, let’s just hard-code it to begin with and add support for wind resistance (which will dampen the animation) which we can modify dynamically to see how the animation is affecting things. Vertex movement happens in world space since that’s the same space as the wind vector. The Wind Resistance property is defined using a range between 0 and 1 so that it appears as a slider in the material Inspector window.
1
2
3
4
5
6
7
8
9
10
11
12
13
14
15
16
17
18
19
20
21
22
23
24
25
26
27
    Properties
    {
        ... see above
        _WindResistance ("Wind Resistance", Range(0, 1)) = 0.0
    }

    HLSLINCLUDE
        ... see above
        float _WindResistance;

        struct Attributes
        {
        ... see above
        }

        Varyings Vert(Attributes i)
        {
            float3 wPos = TransformObjectToWorld(i.vertex);

            // Just make the wind blow to the right for now.
            float2 windVector = float1(1, 0);

            wPos.xy += (1 - _WindResistance) * windVector;

            ... see above
        }
    ENDHLSL

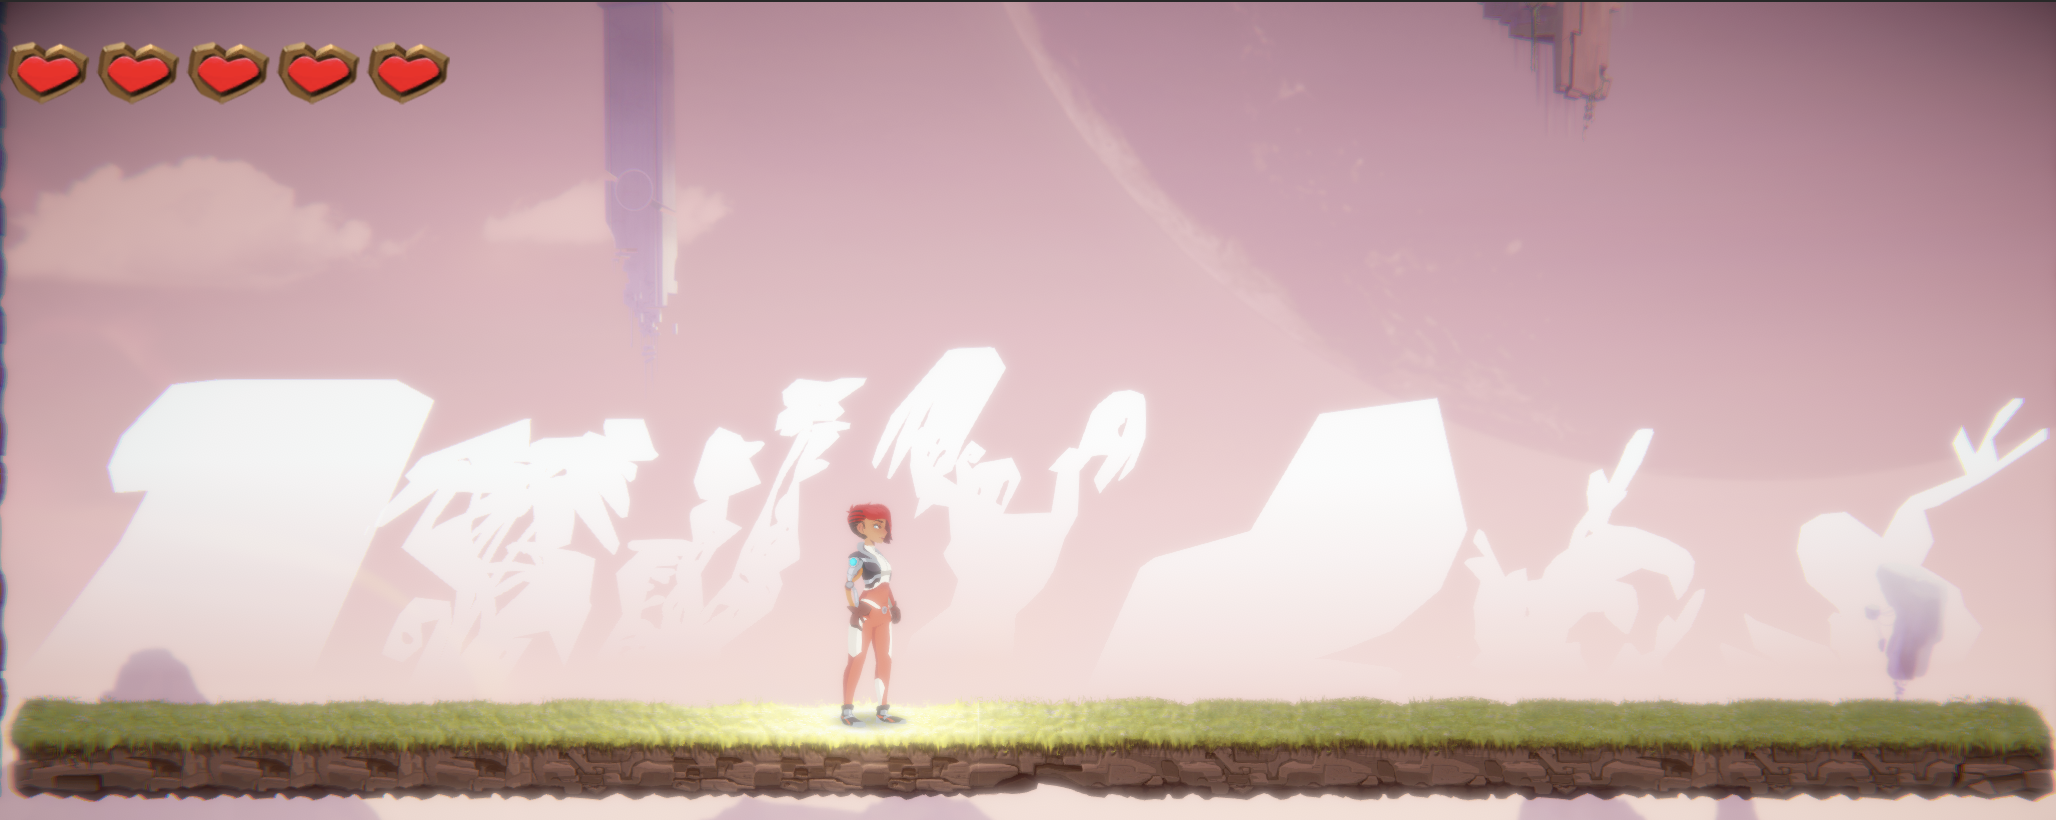
(Left) The original scene.
(Right) The scene with vertex animation on. Wind resistance is being modified. by a slider on the material.
The Root of the Problem
So far the wind just pushes everything uniformly to the side which makes the motion hard to notice at a glance. While that might be fine for some parts of the environment, foliage should be anchored to the ground. Let’s update the shader to keep things firmly planted by using object space coordinates. However, to do that we’ll have to disable dynamic batching to make sure that the object space coordinates are not modified when combining multiple meshes into a single mesh.
Note Unity has given conflicting advice about the performance implications of turning off dynamic batching, so if that’s something that concerns you, an alternative might be to create a grayscale texture with the same texture coordinates of the main texture and read that in the vertex shader to find the amount of wind resistance at each vertex. This would also have the benefit of supporting vines hanging from the roof of a cave which should be anchored at the top instead of the bottom.
It should be possible to make this a lower resolution texture since it’s only sampled per-vertex.
1
2
3
4
5
6
7
8
9
10
11
12
13
14
15
16
17
18
19
20
21
22
23
24
25
26
27
    Properties
    {
        ... see above
    }

    HLSLINCLUDE
        ... see above

        Varyings Vert(Attributes i)
        {
            float3 wPos = TransformObjectToWorld(i.vertex);

            // Just make the wind blow to the right for now.
            float2 windVector = float1(1, 0);

            // Assuming object space coordinates of -1 -> 1, and that vertexes at -1 should remain stationary,
            // transform to 0 to 1 and apply wind resistance.
            // This would need to be inverted in a cave with vines hanging from the ceiling, for example.
            // This would also be an ideal place to use a secondary texture with the same texture coordinates as
            // _MainTex to precisely control the attenuation; that would also let us use dynamic batching.
            float heightAttenuation = 0.5 * (1 - _WindResistance) * (1 + i.vertex.y);

            wPos.xy += heightAttenuation * windVector;

            ... see above
        }
    ENDHLSL
(Left) The scene with vertex animation and height attenuation enabled. Wind resistance is being modified by a slider on the material.
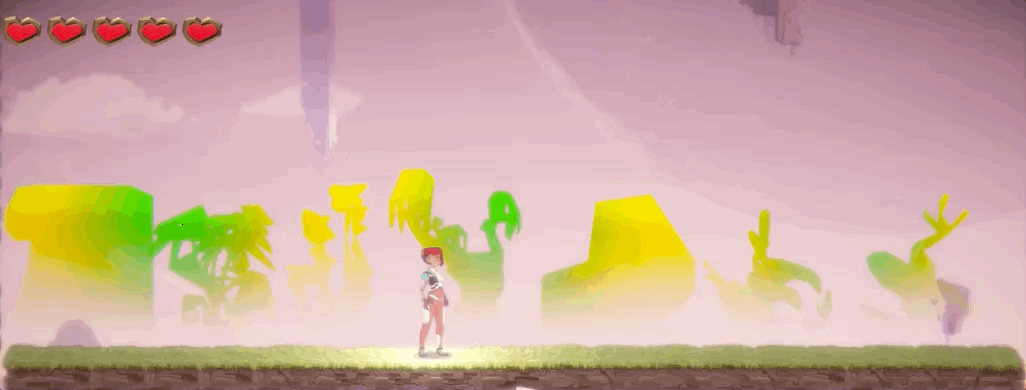
(Right) Debug visualization of the height-based attenuation (opaque is fully affected, transparent is fully unaffected).
As you can see in Figure 6, the bottom part of the plants no longer moves, although you may need a more complex attenuation algorithm depending on the foliage assets that you’re working with.
I’d also recommend adding support to visualize the attenuation with a debug mode in the shader in case you need to double check how it’s being affected. This is especially true if you’re using an alternative attenuation algorithm. I updated the shader to override the vertex color passed to the fragment shader with the height attenuation value and had it affect the transparency. I omitted the implementation from the post, but you can find it in the source code linked at the bottom of the post.
A Noisy Neighbor
In the images above you can see that all the plants move uniformly as if they’re all marching to the same beat. This doesn’t look very natural, though, so we need to vary how they behave. The most common way to add variation is with perlin noise. While there are techniques to calculate noise purely in shaders, using a texture will give your artists more control over how it affects the animation (since they can make it rougher or smoother). Whether you use an algorithm or a texture, it should tile seamlessly so that the texture can tile across world space instead of just being stretched. I generated a noise texture using this website but most image programs should be able to make one, too.
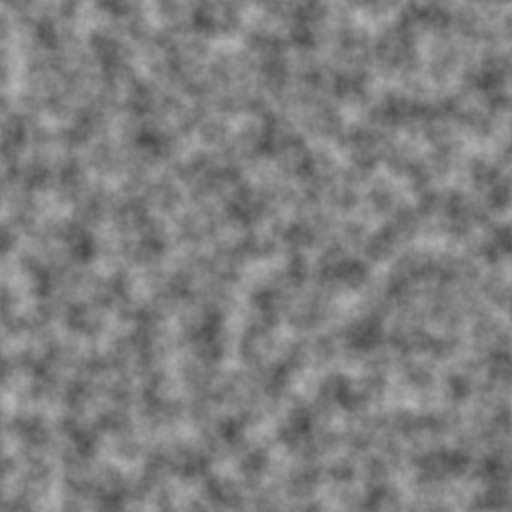
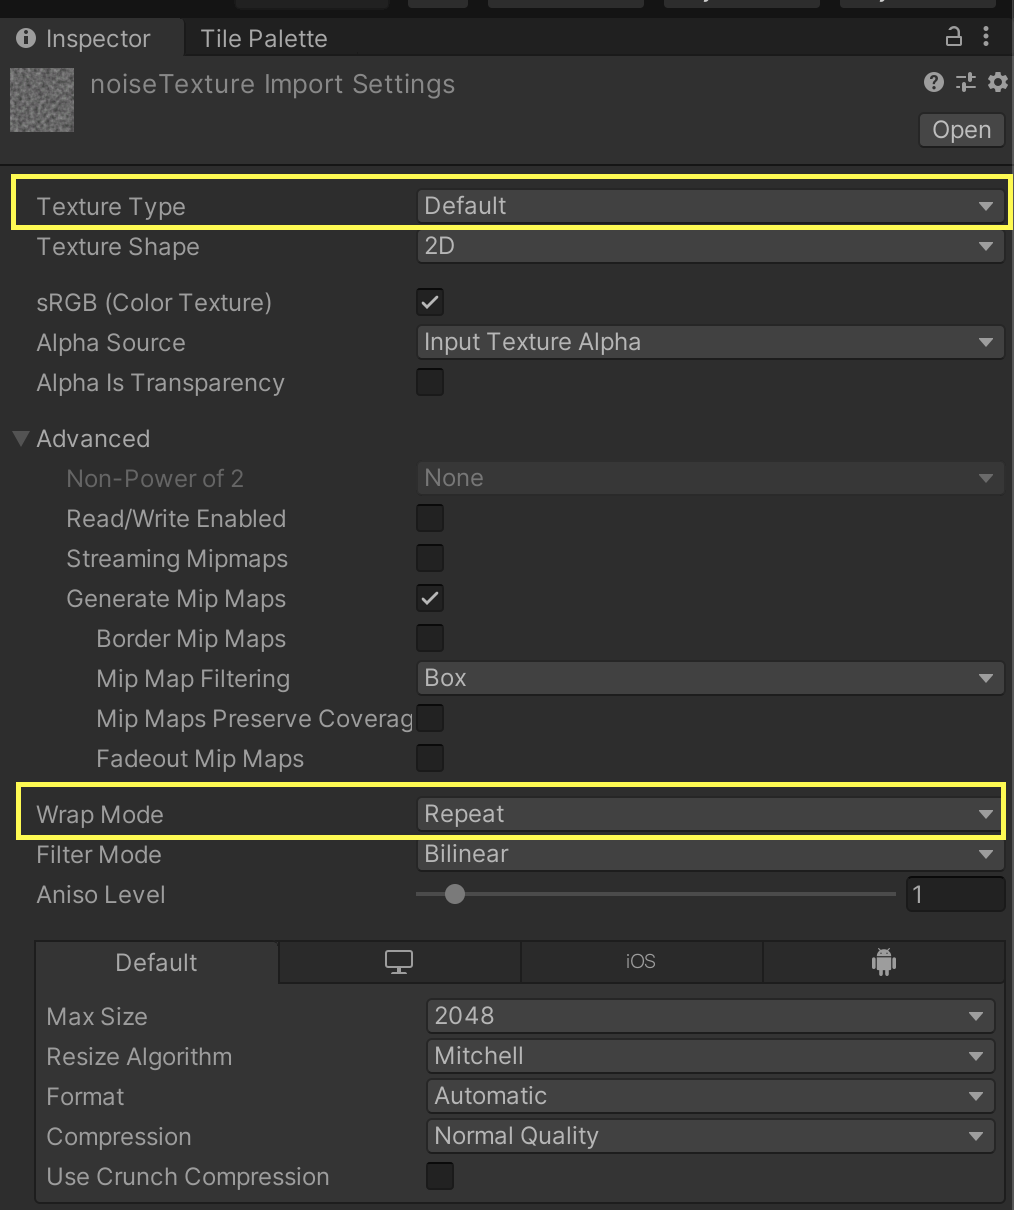
(Left) An example noise texture.
(Right) The Inspector window settings for the noise texture. Note that the **Texture Type** and **Wrap Mode** settings.
Next we’ll update the shader to read from the noise texture using world space coordinates. In addition, we’ll add support to scroll the noise texture (by adjusting its offset with a time value), adjust the noise scale, contrast, scroll speed, and magnitude. You’ll need to tweak these values to match your texture to keep things from looking too similar or too chaotic. If you don’t need or want these to all be modified after you’ve found good values then feel free to remove the properties once you’re happy.
1
2
3
4
5
6
7
8
9
10
11
12
13
14
15
16
17
18
19
20
21
22
23
24
25
26
27
28
29
30
31
32
33
34
35
36
37
38
39
40
41
42
43
44
45
    Properties
    {
        ... see above
        _NoiseTex ("Noise Texture", 2D) = "black" {}
        _NoiseContrast ("Noise Contrast", Range(-1, 1)) = 1.0
        _NoiseFrequency ("Noise Frequency", Float) = 0.25
        _NoiseMagnitude ("Noise Magnitude", Float) = 0.25
        _NoiseScale ("Noise Scale", Float) = 0.25
        _NoiseSpeed ("Noise Speed", Float) = 0.25
    }

    HLSLINCLUDE
        ... see above
        TEXTURE2D_SAMPLER2D(_NoiseTex, sampler_NoiseTex);
        float _NoiseContrast;
        float _NoiseFrequency;
        float _NoiseMagnitude;
        float _NoiseScale;
        float _NoiseSpeed;

        struct Attributes
        {
            ... see above
        }

        Varyings Vect(Attributes i)
        {
            ... see above

            // Sample a noise texture based on scaled world position offset by time and attenuated by the frequency
            // (lower frequencies result in slower motion).
            // Note that because this is sampled in the vertex shader, we have to use the LOD version since the vertex
            // shader is unable to measure fragment derivatives to determine the appropriate mip level.
            float2 windNoiseCoord = (wPos.xy * _NoiseScale + _Time[1] * _NoiseSpeed) * _NoiseFrequency;
            float windNoise = SAMPLE_TEXTURE2D_LOD(_NoiseTex, sampler_NoiseTex, windNoiseCoord, 0).r;

            // Adjust the noise contrast and then attenuate the overall amount of noise.
            windNoise = _NoiseMagnitude * ((windNoise - 0.5) * (_NoiseContrast + 1)) + 0.5;

            // Note, this replaces the previous modification of wPos.xy.
            wPos.xy += heightAttenuation * windVector * windNoise;

            ... see above
        }
    ENDHLSL
This adds a subtle amount of variation so they aren’t in sync anymore (although your results will vary depending on how the noise parameters and texture are configured). I’ve again omitted the implementation of the debugging support but it can be found in the source code link at the bottom of the post.

(Left) The scene with noise affecting the vertex animation.
(Right) The scene with a debug visualization that draws the noise texture. This helps dial in the proper noise parameters.
Being Swayed
After hooking up support for noise, you may also want to add in swaying motion to approximate foliage bouncing back against the wind. This motion will also be in world space and will help simulate that motion being applied in succession to adjacent parts of foliage. We’ll include a similar set of tuning parameters for it like we had with noise to control its scale, scroll speed, and magnitude. Although this doesn’t use noise, since it opposes noise, you may still want to tweak the values to find something that works well for your setup.
1
2
3
4
5
6
7
8
9
10
11
12
13
14
15
16
17
18
19
20
21
22
23
24
25
26
27
28
29
30
31
32
33
34
35
36
37
38
39
40
41
    Properties
    {
        ... see above
        _SwayFrequency ("Sway Frequency", Float) = 0.25
        _SwayMagnitude ("Sway Magnitude", Float) = 0.25
        _SwayScale ("Sway Scale", Float) = 1.0
        _SwaySpeed ("Sway Speed", Float) = 0.25
    }

    HLSLINCLUDE
        ... see above
        float _SwayFrequency;
        float _SwayMagnitude;
        float _SwayScale;
        float _SwaySpeed;

        struct Attributes
        {
            ... see above
        }

        Varyings Vect(Attributes i)
        {
            ... see above

            // To simulate the motion of foliage swaying in the wind (that is stretching & contracting), sample a wave
            // using scaled world space coordinates offset by time and attenuated by the desired frequency
            // (lower frequencies result in slower motion).
            // Note that the wave sample is between -1 -> 1, so it will negate or exaggerate motion in the direction of
            // the wind.
            // Also, since the wave is sampled using world space coordinates, sine could be used instead of cosine.
            float2 windSway = _SwayMagnitude * (cos((wPos.xy * _SwayScale + (_Time[1]).xx * _SwaySpeed)) * _SwayFrequency);

            // Adjust the world space vertex based on height-attenuated noise and sway motion in the direction and
            // magnitude of the wind.
            // Note, this replaces the previous modification of wPos.xy.
            wPos.xy += heightAttenuation * (windVector * windNoise + windVector * windSway);

            ... see above
        }
    ENDHLSL
Here you can see it in isolation (no noise is applied) along with a debug view that shows the amount of sway applied to each vertex which is helpful when tuning the material properties.

(Left) The scene with sway affecting the vertex animation. I've egaggerated the sway to make it noticable.
(Right) The scene with a debug visualization that draws the sway amount. This helps dial in the proper parameters.
Getting Directions
So far we’ve just been using a fixed wind direction. While you could configure it as a shader property and modify it per renderer, that might not perform well if you have many foliage instances if you need to dynamically update the wind. Thankfully, Unity permits specifying global shader values so we’ll do that. We’ll create a new WindManager class that uses the direction and intensity of a Directional Wind Zone component and then modifies the shader every time the direction updates.
1
2
3
4
5
6
7
8
9
10
11
12
13
14
15
16
17
18
19
20
21
22
23
24
25
26
27
28
29
30
31
32
33
34
35
36
37
38
39
40
41
42
43
44
45
46
47
48
49
50
51
52
53
54
55
56
57
58
59
60
61
62
63
64
65
66
67
68
69
70
71
72
73
74
75
76
77
78
79
80
81
82
83
84
85
86
87
88
89
90
91
92
93
94
95
96
97
98
99
100
101
102
103
104
105
106
107
108
109
110
111
112
113
114
115
116
117
118
119
120
121
122
123
124
125
126
127
128
129
130
131
132
133
134
135
136
137
138
139
using UnityEngine;

namespace Windy
{
    public class WindManager : MonoBehaviour
    {
        #region Constants

        private const string cVectorPropertyName = "_WindVector";

        #endregion

        #region Fields

        [SerializeField] private float _WindDirectionEvaluateSecondsMinimum;
        [SerializeField] private float _WindDirectionEvaluateSecondsMaximum;
        [SerializeField] private float _WindDirectionRotateSecondsMinimum;
        [SerializeField] private float _WindDirectionRotateSecondsMaximum;
        [SerializeField] private WindZone _WindZone;

        private static readonly int sVectorPropertyID;

        private float _WindDirectionEvaluateSeconds;
        private float _WindDirectionEvaluateTimer;
        private Quaternion _WindDirectionRotationStart;
        private Quaternion _WindDirectionRotationTarget;
        private float _WindDirectionRotateSeconds;
        private float _WindDirectionRotateTimer;

        #endregion

        static WindManager()
        {
            sVectorPropertyID = Shader.PropertyToID(name: cVectorPropertyName);
        }

        protected void Awake()
        {
            _WindDirectionRotationStart = _WindDirectionRotationTarget = Quaternion.identity;
        }

        protected void Update()
        {
            UpdateWindDirection();
        }

        private static bool UpdateTimer(float deltaTime, ref float timer, float seconds)
        {
            timer += deltaTime;
            return timer >= seconds;
        }

        private static void StartTimer(ref float seconds, float secondsMinimum, float secondsMaximum) =>
            seconds = (secondsMaximum - secondsMinimum) * Random.value + secondsMinimum;

        private void UpdateWindDirection()
        {
            bool evaluateTimerExpired = UpdateTimer(
                deltaTime: Time.deltaTime,
                timer: ref _WindDirectionEvaluateTimer,
                seconds: _WindDirectionEvaluateSeconds);

            // Wait until it's time to pick a new rotation.
            if (evaluateTimerExpired)
            {
                // Keep the previous target as the new starting rotation and select the new rotation.
                // Note that this assumes a specific rotation around the Y axis favorable to 2D games, so you may need
                // to adjust this for your game's needs.
                _WindDirectionRotationStart = _WindDirectionRotationTarget;
                _WindDirectionRotationTarget = Quaternion.Euler(x: (180f * Random.value) - 180f, y: 90f, z: 0f);

                // Reset the rotation timer and pick a new rotation duration.
                _WindDirectionRotateTimer -= _WindDirectionRotateSeconds;
                StartTimer(
                    seconds: ref _WindDirectionRotateSeconds,
                    secondsMinimum: _WindDirectionRotateSecondsMinimum,
                    secondsMaximum: _WindDirectionRotateSecondsMaximum);

                // Reset the evaluation timer and pick a new evaluation duration (which includes the rotation duration).
                _WindDirectionEvaluateTimer -= _WindDirectionEvaluateSeconds;
                StartTimer(
                    seconds: ref _WindDirectionEvaluateSeconds,
                    secondsMinimum: _WindDirectionEvaluateSecondsMinimum,
                    secondsMaximum: _WindDirectionEvaluateSecondsMaximum);
                _WindDirectionEvaluateSeconds += _WindDirectionRotateSeconds;
            }

            // Wait until the rotation has finished. Note that we stop updating it once the timer has met or passed the
            // requested duration since it would otherwise keep accumulating during the evaluation period.
            bool rotationTimerExpired =
                _WindDirectionRotateTimer >= _WindDirectionRotateSeconds ||
                UpdateTimer(deltaTime: Time.deltaTime,
                    timer: ref _WindDirectionRotateTimer,
                    seconds: _WindDirectionRotateSeconds);

            // If the rotation has expired, then just ensure that the rotation is set to the target.
            if (rotationTimerExpired)
            {
                if (_WindZone != default)
                {
                    _WindZone.transform.rotation = _WindDirectionRotationTarget;
                }
            }
            // Otherwise perform spherical linear interpolation between the start and end rotation based on elapsed
            // time.
            else
            {
                if (_WindZone != default)
                {
                    _WindZone.transform.rotation = Quaternion.Slerp(
                        a: _WindDirectionRotationStart,
                        b: _WindDirectionRotationTarget,
                        t: _WindDirectionRotateTimer / _WindDirectionRotateSeconds);
                }
            }

            Vector4 windVector = default;
            if (_WindZone != default)
            {
                Vector3 windDirection = _WindZone.transform.forward;

                // The wind vector is attenuated by the alignment with the horizontal since that's when the wind is most
                // noticeable in a 2D setup, but this can be removed or altered depending on project dimensions &
                // directions.
                float windAttenuation = Vector2.Dot(lhs: windDirection, rhs: Vector2.right);

                // Perform a vector projection of the wind direction onto the right vector to calculate the resulting
                // wind vector.
                // We're just accessing WindZone.windMain here because there's no way to measure the current intensity
                // including pulses & turbulence. If these factors are important, I'd recommend implementing them
                // independently and then modifying windMain with the result.
                windVector = _WindZone.windMain * windAttenuation * Vector2.right;
            }

            // Update any interested shaders with the new wind vector.
            Shader.SetGlobalVector(nameID: sBufferVectorArrayPropertyID, values: windVector);
        }
    }
}
You can see in Figure 8 that the wind direction now changes randomly and we’ve attenuated the adjustment based on how closely aligned the wind vector is with the x axis (since this is a 2D game and we don’t want it to stretch tree trunks vertically).
An Array of Possibilities
While there is some variation thanks to the noise and sway parameters, you can see that they are all essentially still moving in unison with some subtle delay. While this is probably fine for small clusters of closely placed foliage, it will look odd across a whole field of them. This is happening because we’re just using a single global vector to specify the direction they should all move. So let’s change the scalar value to an array and setup the values to decay over time into adjacent indices. We’ll also need to update individual renderers to choose an index in the buffer (thereby determining how delayed they are in responding to changes to the wind direction). We’ll use a new WindIndexer component to assign an index to a MaterialPropertyBlock. This will keep the modifications from requiring a unique copy of the material which can get expensive if you have many instances; it’s already using a block to configure which sprite texture it is using.
1
2
3
4
5
6
7
8
9
10
11
12
13
14
15
16
17
18
19
20
21
22
23
24
25
26
27
28
29
30
31
32
33
34
35
36
37
38
39
40
41
42
43
44
45
46
47
48
49
50
51
52
53
54
55
56
57
58
59
60
61
62
63
64
65
66
67
68
69
70
71
72
73
74
75
76
77
78
79
80
81
82
83
84
85
86
87
88
89
90
91
92
93
94
95
96
97
98
99
100
101
102
103
104
105
106
107
108
109
110
111
112
113
114
115
116
117
118
119
120
121
122
123
124
125
126
127
128
129
130
131
132
133
134
135
136
137
138
139
140
141
142
143
144
145
146
147
148
149
150
151
152
153
154
155
156
157
158
159
160
161
162
163
164
165
166
167
168
169
170
171
172
173
174
175
176
177
178
179
180


 using UnityEngine;

 namespace Windy
 {
     public class WindManager : MonoBehaviour
     {
         #region Constants

         public const int cBufferLength = 8;

         private const string cBufferVectorArrayPropertyName = "_WindVectorArray";

         #endregion

         #region Fields

         ... see above
         [SerializeField] private float _BufferDecaySeconds;

         private static readonly int sBufferVectorArrayPropertyID;

         private readonly Vector4[] _BufferCurrentArray = new Vector4[cBufferLength];
         private readonly Vector4[] _BufferTargetArray = new Vector4[cBufferLength];
         private float _BufferDecayTimer;
         ... see above

         #endregion

         static WindManager()
         {
             sBufferVectorArrayPropertyID = Shader.PropertyToID(name: cBufferVectorArrayPropertyName);
         }

         protected void Awake()
         {
             ... see above
         }

         protected void Update()
         {
             UpdateWindDirection();
             UpdateBufferArrays();
         }

         private static bool UpdateTimer(float deltaTime, ref float timer, float seconds)
         {
             ... see above
         }

         private static void StartTimer(ref float seconds, float secondsMinimum, float secondsMaximum) =>
             ... see above

         private void UpdateWindDirection()
         {
             ... see above, although the modification of the vector has been moved to UpdateBufferArrays
         }

         private void UpdateBufferArrays()
         {
             // Advance time and calculate how many existing buffers have finished interpolating so we know how many
             // buffer indices to skip.
             int decayCount;
             if (_BufferDecaySeconds > 0f)
             {
                 _BufferDecayTimer += Time.deltaTime;
                 decayCount = Mathf.FloorToInt(f: _BufferDecayTimer / _BufferDecaySeconds);
                 _BufferDecayTimer -= decayCount * _BufferDecaySeconds;
                 decayCount = Mathf.Min(a: cBufferLength - 1, b: decayCount);
             }
             else
             {
                 decayCount = cBufferLength - 1;
             }

             Vector4 windVector = default;
             if (_WindZone != default)
             {
                 Vector3 windDirection = _WindZone.transform.forward;

                 // The wind vector is attenuated by the alignment with the horizontal since that's when the wind is most
                 // noticeable in a 2D setup, but this can be removed or altered depending on project dimensions &
                 // directions.
                 float windAttenuation = Vector2.Dot(lhs: windDirection, rhs: Vector2.right);

                 // Perform a vector projection of the wind direction onto the right vector to calculate the resulting
                 // wind vector.
                 // We're just accessing WindZone.windMain here because there's no way to measure the current intensity
                 // including pulses & turbulence. If these factors are important, I'd recommend implementing them
                 // independently and then modifying windMain with the result.
                 windVector = _WindZone.windMain * windAttenuation * Vector2.right;
             }

             // Index N-1: Active simulation.
             _BufferCurrentArray[cBufferLength - 1] = _BufferTargetArray[cBufferLength - 1] = windVector;

             // Index [0, N-1): Previous vector interpolation.
             // This might be a good area to experiment with random timer durations and different types of interpolation.
             if (decayCount > 0)
             {
                 for (int bufferIndex = 0; bufferIndex < cBufferLength - 1; ++bufferIndex)
                 {
                     _BufferTargetArray[bufferIndex] =
                         bufferIndex + decayCount < cBufferLength
                         ? _BufferTargetArray[bufferIndex + decayCount]
                         : _BufferTargetArray[cBufferLength - 1];
                 }
             }

             // Interpolate towards the target vector in the next buffer index based on normalized elapsed time.
             if (_BufferDecaySeconds > 0f)
             {
                 for (int bufferIndex = 0; bufferIndex < cBufferLength - 1; ++bufferIndex)
                 {
                     _BufferCurrentArray[bufferIndex] = Vector4.Lerp(
                         a: _BufferTargetArray[bufferIndex],
                         b: _BufferTargetArray[bufferIndex + 1],
                         t: _BufferDecayTimer / _BufferDecaySeconds);
                 }
             }
             // Otherwise just set all values to the target.
             else
             {
                 for (int bufferIndex = 0; bufferIndex < cBufferLength - 1; ++bufferIndex)
                 {
                     _BufferCurrentArray[bufferIndex] = _BufferTargetArray[bufferIndex];
                 }
             }

             // Update any interested shaders with the new wind vectors.
             Shader.SetGlobalVectorArray(nameID: sBufferVectorArrayPropertyID, values: _BufferCurrentArray);
         }
     }

    public class WindIndexer : MonoBehaviour
    {
        #region Constants

        private const string cWindIndexPropertyName = "_WindIndex";

        #endregion

        #region Fields

        [SerializeField] private SpriteRenderer _SpriteRenderer;

        private static readonly int sWindIndexPropertyID;

        #endregion

        static WindIndexer()
        {
            sWindIndexPropertyID = Shader.PropertyToID(name: cWindIndexPropertyName);
        }

        protected void Awake()
        {
            if (_SpriteRenderer != default)
            {
                MaterialPropertyBlock propertyBlock = new MaterialPropertyBlock();

                // If the renderer already has a property block, we need to grab its current values to avoid resetting
                // important information like texture assignment, etc.
                if (_SpriteRenderer.HasPropertyBlock())
                {
                    _SpriteRenderer.GetPropertyBlock(properties: propertyBlock);
                }

                // Randomly pick an index between 0 and the buffer length.
                propertyBlock.SetInt(
                    nameID: sWindIndexPropertyID,
                    value: Random.Range(min: 0, max: WindManager.cBufferLength - 1));

                _SpriteRenderer.SetPropertyBlock(properties: propertyBlock);
            }
        }
    }
}

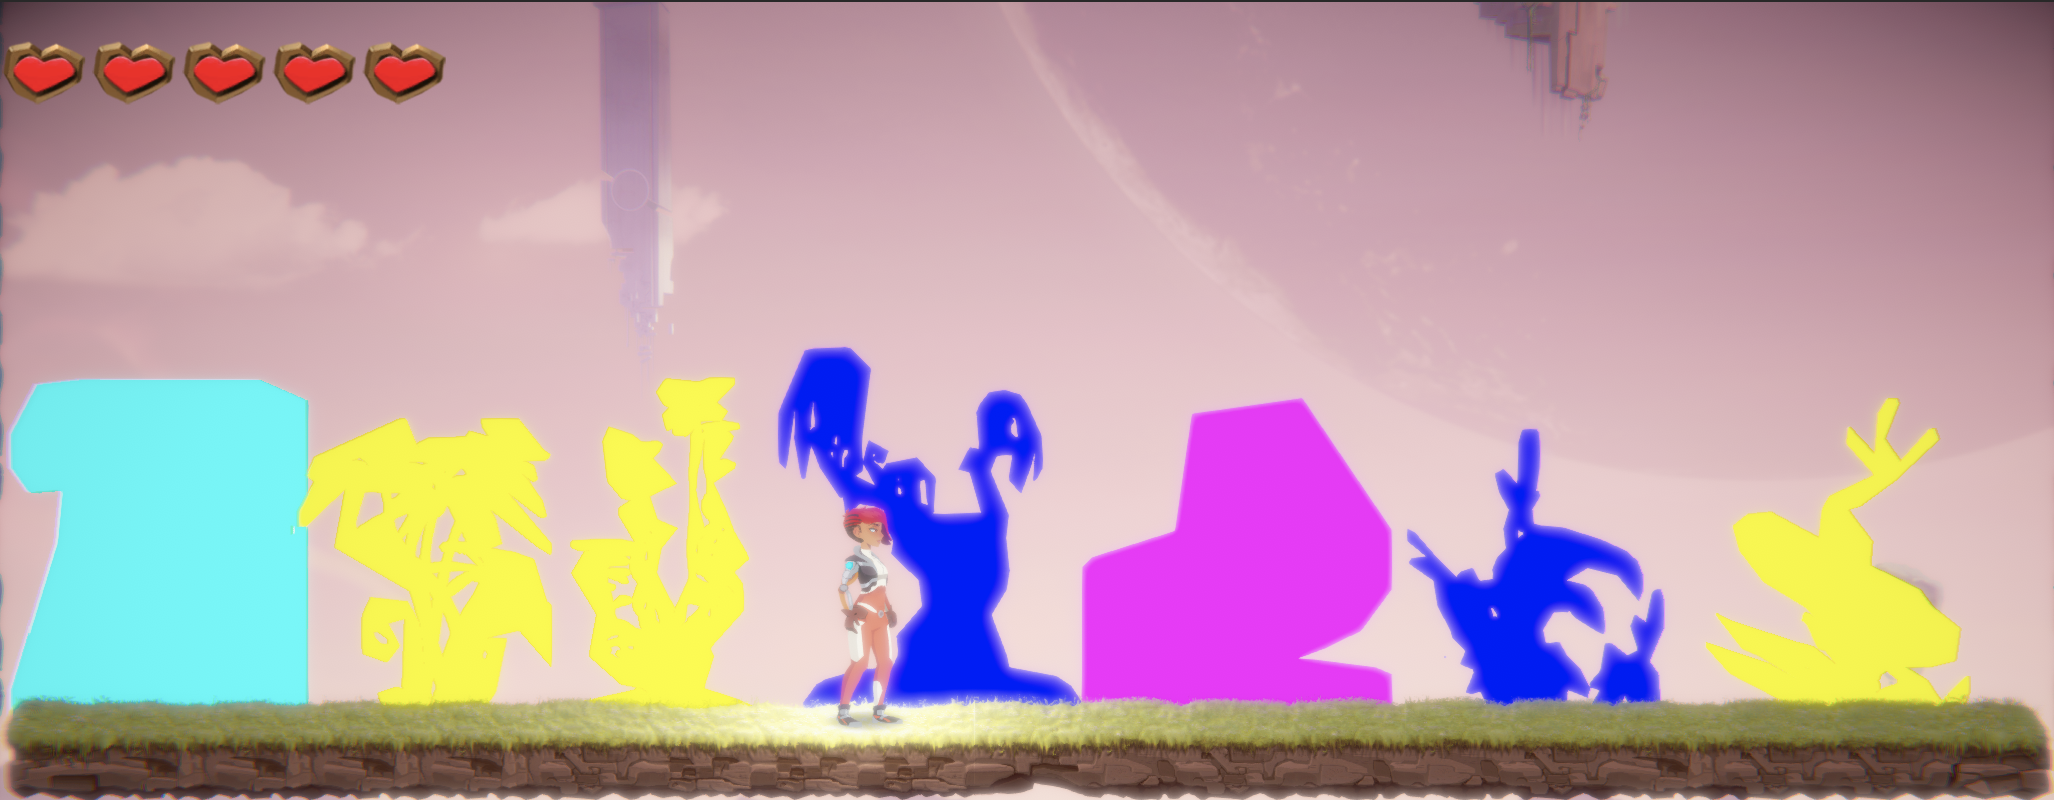
(Left): The scene with dynamically updating and indexed wind direction.
(Right): A debug view of the scene that shows which index is assigned to each renderer.
#Winding Down We were pretty happy with the results since it saved us having to hand-animate our foliage and gave us the ability to use a solution (Wind Zones) that also affects particles. All of the techniques above should be easily modified to take place in 3D if desired, starting with the wind vector. I think going with a mask-based approach to configuring per-vertex resistance values is a lot more flexible (no pun intended) than relying on the object space position of the vertex, but it requires more work for artists. In addition, the method you use to generate meshes for the sprites can have a big impact as well. Unity’s built-in mesh generation isn’t very efficient but there are alternatives on the Asset Store that provide the same quality shape fitting but with more efficient use of vertices.
Please let me know how this works out for you, I’d love to see some footage of it in your games.